Measuring the feminine thorax outline

Measuring the feminine thorax outline


We finished the last post with two questions.

This post is the answer to the first question: How can we measure the feminine thorax outline?

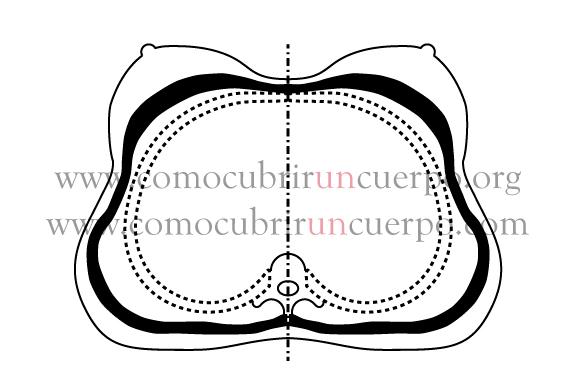
The feminine thorax outline is a real measurement but it is impossible to measure directly because of the breasts.

We can find several solutions to measure it, the most common solutions are measuring above the breasts or measuring passing over the sub mammary fold. Both of these measurements give us incorrect items and therefore a false thorax outline measurement.

To calculate the development of the breasts we must use the bone structure, that is to say the male body structure.

The male trunk structure has a peculiarity: the distance from the seventh cervical vertebra to the waistline in its intersection with the vertebral column is equal to the distance between the tip of the neckline to the waistline in its intersection with the front sagittal axe, passing on the nipple and dropping parallel at the front axe. (Usually for a man with a regular body type the front measurement is a cm longer the front measurement than the back one, but this cm is considered to be fit allowance).

The male and female bone structures are equal but not identical, so we can use this equality of measurements.

The greater is the breasts volume, the greater the difference between the back and front trunk length will be.

desarrollo de pecho development of the breasts développement de poitrine sviluppo di petto

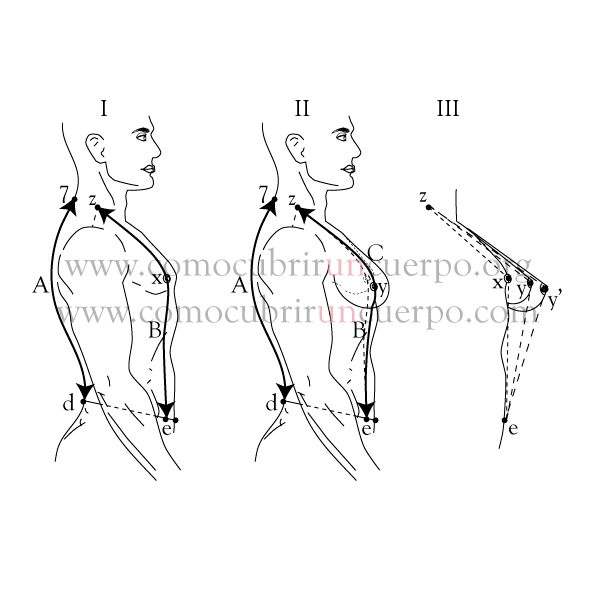
The development of the breasts is the difference between the length front (z-x-e for the male body or z-y-e for the female body) and back trunk (7-d).
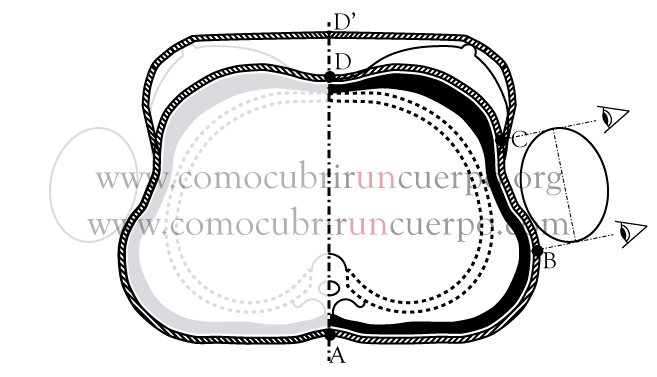
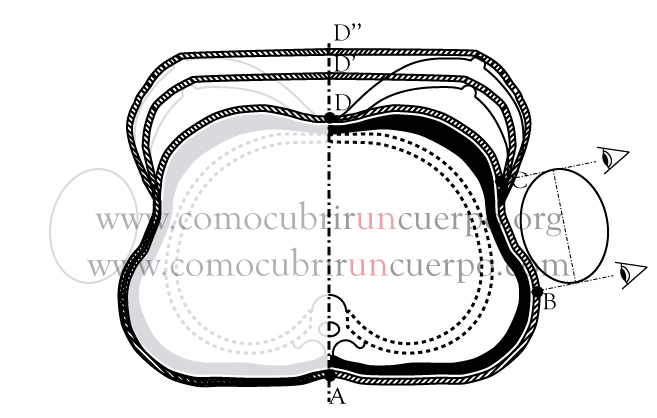
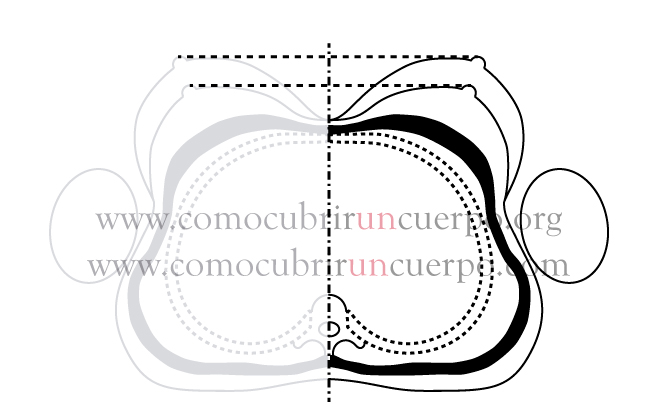
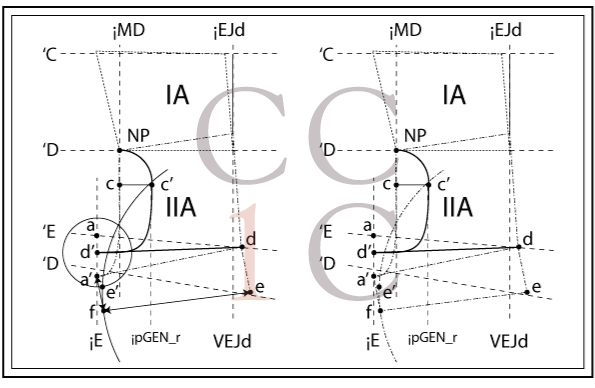
Figure I is the male body, figure II the male body with medium volume female breasts. In figure III we show the male outline with a medium and another greater volume female breasts contour.

The value of the development of the breasts is about a twelfth of a half-feminine breast outline. Most tables of measurements where we can find the two trunk lengths apply this proportion or add 6cm to the back length measurement.

intersección del eje sagital con la silueta del delantero intersection of the sagittal axe with the middle front outline l’intersection de l’axe sagittal avec la silhouette du devant intersezione dell’asse sagitale con la siluetta dal davanti Còmo cubrir un cuerpo Comocubriruncuerpo

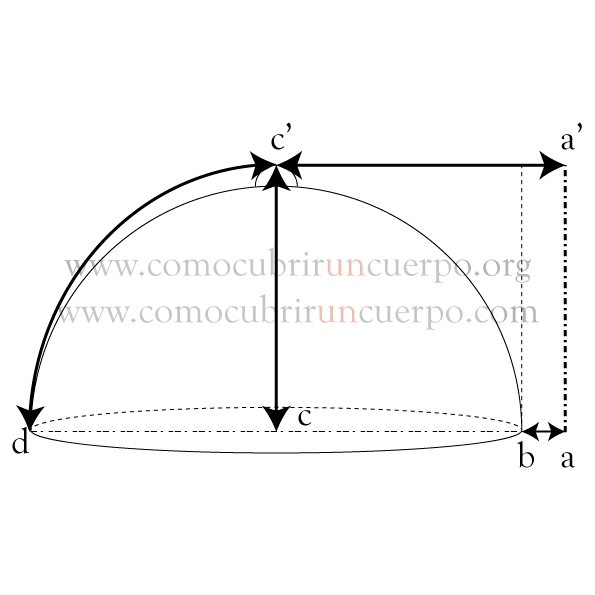
A is the intersection of the sagittal axe with the middle front outline, b is the distance between the sagittal axe and the end of the sternal manubrium, c is the male nipple, the segment b-d is the diameter of the breast, c’ is the female nipple and the segment c-c’ is the breast projection.

The whole breast development is twice the measurements of the arc between c’-d minus the diameter of the breast (d-b). We can calculate it as the half perimeter of the circumference generated by the breast projection (c-c’) minus twice the projection breast measurement, if we consider the breast as a half sphere. If we consider the breast as a half oblate semi-ellipsoid, the calculation becomes more complicated. The result is almost the same, so is it better to consider it as a sphere (circle in revolution).

The distance between a’ and c’ and between a and c is the same, when we measure the breast female outline we trace a straight line between the nipples, then the breast female outline, theoretically, only increases half development of each breast.

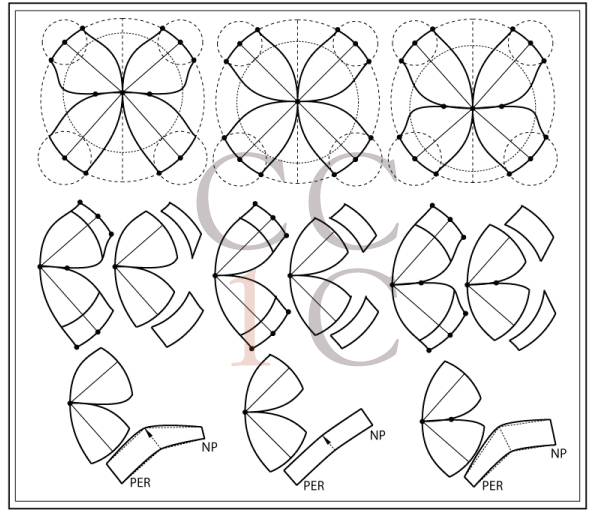
The segments a-a’ and c-c’ in the last illustration are parallel, but really they are oblique as we can see in the next image.

contorno de tórax femenino thorax outline contour de poitrine féminin giro torace femminile Còmo cubrir un cuerpo comocubriruncuerpo

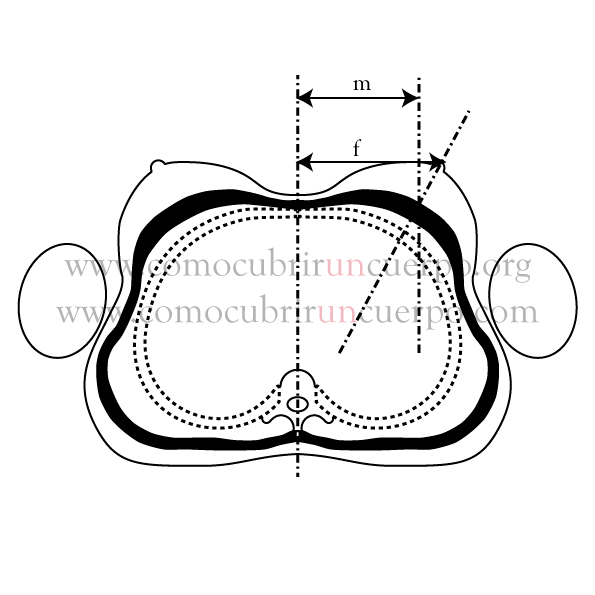
M is the half distance between nipples and f is the same measurement in the female outline. F can change because of the volume of the female breasts. Also, f can be distorted because of the bra cups. The development between both distances (horizontal breast development) should be, more or less half of the vertical breast development.

If we identify horizontal and vertical breast development to calculate the thorax outline, we subtract the back length from the front length trunk.

It is very important to remember that when we identify both developments the horizontal one has the same value because of the increase of the distance between the nipples in the female outline. This difference is important when we work in corset items with separated cups.

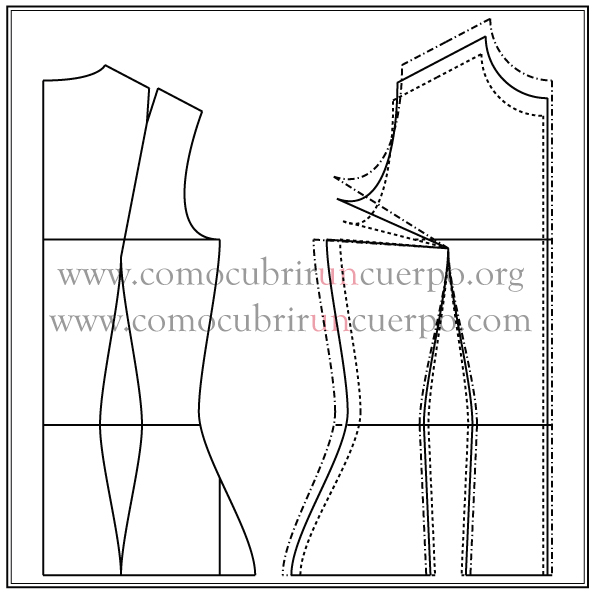
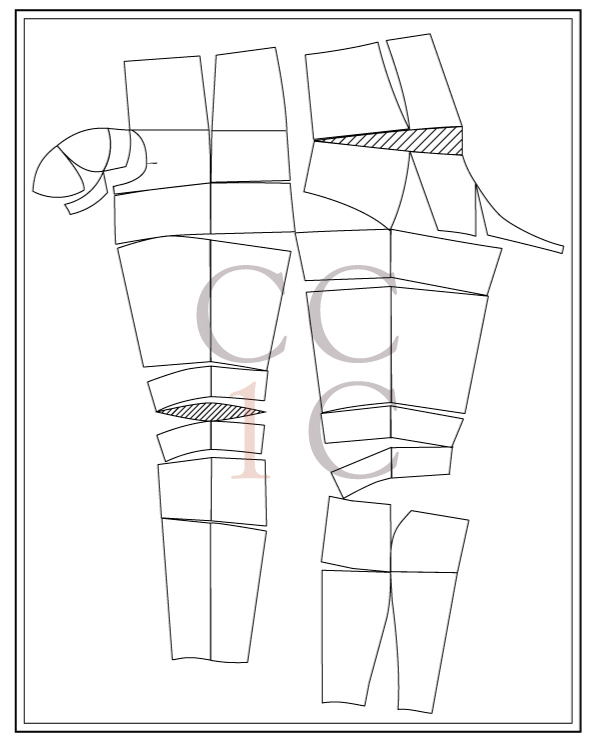
Having an approximation of the thorax outline, we can calculate the projection of breasts by triangulations, and we can find the position and development of the Spence’s tail. With the proportional position of the Spence’s tail and the breast projection, we can trace proportional and easy progressive ad anatomical breasts cups.

Those explanations will the subject of future posts.

La pierna desollada

La pierna desollada

La pierna desollada es el nuevo libro de Cómo Cubrir Un Cuerpo.
Su objetivo es analizar las formas y volúmenes de la extremidad inferior para realizar patrones base que sean una segunda piel.

PORTADA_Vol-II_-Pierna-desollada Còmo cubrir un cuerpo comocubriruncuerpo

El libro de 203 páginas contiene 171 ilustraciones y 15 tablas.

Estructura del libro.

En las primeras páginas, a modo de introducción, hace un análisis de la cintura pelviana del muslo, rodilla y pierna desde un punto de vista anatómico.
Luego analiza los ejes estructurales de la pierna y compara las diferentes morfologías entre el hombre y la mujer.
Después de ésta introducción entra en materia.

Moulage de la extremidad inferior

Pierna-desollada Còmo cubrir un cuerpo comocubriruncuerpo

Se describe cómo se realiza un moulage en una extremidad inferior, cómo se pone a plano y cómo se obtiene el patrón.
Se estudia cada una de las piezas para entender dónde cómo y porqué se concretan las formas de la pierna.
Este moulage se realiza en estación bípeda por lo que no entran en juego los desarrollos de las articulaciones.

Pierna-desollada Còmo cubrir un cuerpo comocubriruncuerpo

Patrón con medidas directas

Una vez analizada la sesión de moulage, se realiza el mismo patrón a partir de medidas directas.
El trazado de este segundo patrón se deduce a partir de la sesión de moulage.
Al patronar se pone en relieve la importancia de las medidas que se deben tomar para que el resultado sea lo más próximo a la glasilla de la sesión de moulage.

Pierna-desollada Còmo cubrir un cuerpo comocubriruncuerpo

En este segundo proceso se pone en evidencia el valor de las medidas tomadas con estadímetro y plomada que complementan las medidas tomadas tradicionalmente con la cinta métrica.

Pierna-desollada Còmo cubrir un cuerpo comocubriruncuerpo

Patrón proporcional de los niveles 1 y 2

Una vez realizado este segundo patrón con las medidas directas realizamos el patrón proporcional de la pierna. Tomando las proporciones que se analizaron en el Vol I (“De las medidas y las proporciones).
La técnica de moulage nos da la posibilidad de generar patrones con medidas directas y con medidas proporcionales, patrones deducidos cuyo trazado está lleno de significado porque sabemos qué se esconde detrás de cada costura y el desarrollo que da cada una de las 32 piezas que compone el patrón.
Pierna-desollada Còmo cubrir un cuerpo comocubriruncuerpo

De los tres patrones el más exacto es evidentemente el generado por el moulage.
En un símil con la fotografía es el negativo analógico. Los otros dos son negativos digitales que según la resolución nos dan una mejor o peor calidad de la misma imagen. Sin embargo, el patrón proporcional será mucho más útil para la industria por la fácil modificación y escalado.

Diferentes conformaciones, los desarrollos, la cazuela genital, escalados y la extremidades infantil y femenina

Una vez llegado al patrón proporcional se muestra cómo conformarlo y transformarlo en un patrón para DROP superior a -6 llegando hasta el Drop positivo.
Se analizan los desarrollos de las articulaciones de cadera y rodilla que se concretan en dos piezas suplementarias.
Las piezas de los desarrollos fundamentales para incluirlas en los patrones de las prendas inferiores para dar movilidad al modelo si se realiza la prenda con tejido no elástico y para calcular la elasticidad mínima de la prenda en el caso de prendas realizadas con tejidos elásticos.

Pierna-desollada Còmo cubrir un cuerpo comocubriruncuerpo

Se muestra cómo hacer el encaje y la cazuela genital en el caso de patrón masculino y las variaciones en la horquilla del delantero según el sexo.
El procedimiento para encontrar los patrones al ser un procedimiento general se puede aplicar tanto a hombre como a mujer como a niños.

Pierna-desollada Còmo cubrir un cuerpo comocubriruncuerpo

Por último enseñamos la forma de escalar este patrón en anchos, largos, anchos y largos y anchos y largos cambiando de conformación.
Mostramos el procedimiento para sacar las ratios del escalado al hilo y de cómo sacar las ratios de las piezas unidas por patronaje en las que una o varias piezas pierden el recto hilo.
El libro divide la extremidad en 8 niveles horizontales, los dos primeros cubren desde la cintura hasta la entrepierna.
Los dos primeros niveles son proporcionales a la estructura ósea del tronco, los otros seis no. Por ello centramos el escalado en los niveles I y II.

Pierna-desollada Còmo cubrir un cuerpo comocubriruncuerpoInterés del libro

Este libro interesa a todo patronista que realice prendas inferiores.
Nos da la relación de cada una de las costuras y volúmenes que nos ayudarán en la prueba y en el retoque.
Nos da el conocimiento para poder realizar prendas de corsetería, corsetería correctiva, íntimo y prendas de exteriores de holgura reducida.
Los patrones resultantes son patrones base, en la mayoría de ocasiones necesitarán ser transformados para llegar a una prenda concreta.
Las piezas de estos patrones servirán para deducir en libros posteriores los patrones de las diferentes prendas inferiores.

Os dejamos el índice para dar una mayor información del contenido:

Índice de “La Pierna desollada”

1. Anatomía de la extremidad inferior y de la cintura pélvica, 1

1.1. Estructura ósea de la extremidad inferior, 1

1.1.1. La cintura pélvica o pelviana, 1
1.1.2. Estructura ósea del muslo: el fémur, 5
1.1.3. La rodilla: la rótula, 6
1.1.4. La pierna, 7

1.1.4.1. La tibia, 7
1.1.4.2. El peroné, 8

1.1.5. El pie, 11

1.2. Músculos externos de la extremidad inferior y cadera, 11

1.2.1. Músculos de la región glútea, 11
1.2.2. Músculos del muslo, 13

1.2.2.1. Músculos anteriores del muslo, 13
1.2.2.2. Músculos mediales del muslo, 15
1.2.2.3. Músculos posteriores del muslo, 17

1.2.3. Músculos de la pierna, 19
1.2.4. Músculos del tronco que inciden en las prendas inferiores, 20

1.3. Otros aspectos morfológicos, 21

1.3.1. El pliegue glúteo y la región glútea, 21
1.3.2. El pliegue inguinal o cinturón de Adonis, 23
1.3.3. Órganos genitales masculinos externos, 23

1.4. Léxico utilizado en patronaje de la extremidad inferior, 27
1.5. Niveles de la extremidad inferior, 29
1.6. Ejes de la pierna, 30

1.6.1. Eje frontal de la pierna, 30
1.6.2. Eje lateral de la extremidad inferior (EXI), 31
1.6.3. Ejes de la espalda y lateral interior, 32

1.7. Posiciones de la cintura pélvica, 35
1.8. Diferencias pélvicas según el sexo, 37
1.9. Intersecciones y piezas de la EXI, 42
1.10. Elección del modelo, 43
1.11. Preparación del modelo, 44

2. Toile de montante y pernera, 51

2.1. Moulage, 53

2.1.1. La toile, 53
2.1.2. Desmontaje de la toile, 71
2.1.3. Puesta a plano de la toile, 73
2.1.4. Primera glasilla, 80
2.1.5. Primera prueba y ajuste de la glasilla, 81
2.1.6. Los desarrollos de cadera y de rodilla, 83
2.1.7. Trazado de las piezas de desarrollo, 86
2.1.8. Despiece completo de la toile de una extremidad inferior, 87
2.1.9. Análisis de las piezas del montante, 89

2.1.9.1. Cuádruple pinza del glúteo, concepto, 89
2.1.9.2, Abatimiento de la horquilla de espalda, 92
2.1.9.3. La costura de fondo, 93
2.1.9.4. La costura lateral de los niveles I y II, 95
2.1.9.5. Línea de cintura de las piezas del nivel I, 97
2.1.9.6. Piezas delanteras de la toile, 98
2.1.9.7. La pieza del desarrollo de cadera, 101

3. Trazado de la Cazuela Genital (CZ), 103
4. Trazado mediante medidas directas, 110

4.1. Medidas del montante (MTE): niveles I y II, 110
4.2. Trazado del MTE con medidas, 120
4.3. Medidas de las perneras, 135
4.4. Trazado de las perneras, 135
4.5. Pieza IIA para inclusión de la cazuela genital, 139

5. Trazado proporcional del montante de la extremidad inferior (conformación normal) ,145
6. Escalado del patrón proporcional del montante, 153

6.1. Escalado de la conformación normal, 154

6.1.1. Escalado de 5 tallas con la misma conformación y DROP, 154
6.1.2. Escalado de las tallas superiores de la misma conformación y DROP diferente, 160

6.2. Sistema de entalles en las diferentes conformaciones de cintura, 164

6.2.1. DROP mayor a DROP-6: conformación robusta y obesa, 164
6.2.2. DROP menor a DROP-6 conformaciones atléticas y junior, 172
6.2.3. El montante de la extremidad inferior y las tallas infantiles, 172
6.2.4. El montante y las tallas femeninas, 173

7. Trazado proporcional del montante de la conformación obesa, 174
8. Escalado mediante entretallas directas, 178
9. Las perneras, los ejes y el escalado, 186

9.1. Unión de las piezas de las perneras en base a sus contornos, 187
9.2. Unión de las piezas de las perneras en base a los ejes mecánicos de la
extremidad, 192
9.3. Los cruces de las piezas, 194

10. El escalado de las perneras, 197
11. El desarrollo de rodilla y de cadera, 199
12. Los desarrollos y los tejidos elásticos, 201
13. Bibliografía, 205
14. Ilustraciones, 206
15. Tablas, 210
16. Índice, 211

The tripartite breast outline

The tripartite breast outline.

This post is the third part of a discussion that begins in the post: “A picture is worth a thousand words”

The tripartite waist outline is the waist outline measurement, which includes two complementary measurements. It is a tailoring measurement method.

It distributes the width-pieces of a pattern easily; never mind the sex of the body.

Sección de pecho hombre mujer Cómo cubrir un cuerpo

We include in the last post image, the arms sections, sagittal axe (pointed & dashed line), delete the feminine breast outline and we draw the left part of the image in half-transparency.

We measure the complete breast outline from A to A contouring the trunk. The measuring tape must be parallel to the floor, graze the armpits, and pass on the nipples. This outline must be divided by two (length from A to D), because patronage considers a body to be symmetrical. The breast outline is a trunk’s contour and the axe of symmetry is the sagittal axe (A-D).

We measure the tripartite breast outline as the regular breast outline, but we will mark the last number that we can see before the arm hides the measuring tape, and the first number that we can see after the arm.

It is better to measure the complete outline and divide it by two than to measure the distance between A and D directly. One-half breast part is always greater than the other one because the unequal pectoral muscle development. The variation between the right and left parts is equal to one cm or more. Half of the complete breast-outline calculates directly an average between right and left parts.

The distance between A and B is the width of the back measured along the horizontal armpit level line.

The distance between B and C is the width of the base of the armpit rectangle.

The distance between c and D is the width of the front part along the horizontal armpit level line.

Sección de pecho hombre mujer Cómo cubrir un cuerpo

We draw two breasts on the masculine breast-outline. Let us imagine a man wearing a padded bra.

We find the length variation between the old and the new breast-outline in the distance between C and D. C’-D is longer than C-D.

The same man with a padded bra with larger cups will be like this:

Sección de pecho hombre mujer Cómo cubrir un cuerpo

The new outline increases only section C-D’’

The section A-C (section A-B plus section B-C) increases in a constant proportion between male and female breast-outlines, as we see in the anterior post.

The variation between male and female outlines is located in the section C-D. This section increases in the female contour. It does not increase constantly and proportionally compared to the male breast outline.

In upper items patronage we can affirm that a woman is a man with breasts.

When we measure female breast-outline, normally we draw a line between the nipples. The metric tape does not touch the sternum skin.

Sección de pecho hombre mujer Cómo cubrir un cuerpo

If we measure a female breast-outline touching the sternum skin, the distance between C and D increases.

The female contour without the breast is the thorax outline (female thorax-outline is the same as the male breast-outline).

The female contour that does not touch the sternum is the female breast-outline.

The female contour that touches the sternum is the corset breast-outline.

The male chest-outline is the male breast-outline.

Those outlines and their differences are very important to trace good female patterns.

The shortest of the three outlines is the thorax one and the longest is the corset breast outline.

The sections A -B and B-C are the widths of the back and side-body pieces without enlargements. The section C-D is the front piece.

The first two sections are close to the thoracic cage; the last section includes the female morphological variations.

Male and female thoracic cages are equal but not identical. Because of their equality we can trace the patterns of the pieces of back and side-body of male and female in the same way. The front female will be traced in exactly the same way as the male one (the man without the bra) and after that, we will include some differences to adjust the pattern to the morphological female differences.

A pattern can have several different front parts because of the differents female breast developments, as we show in the next image.

desarollo pecho Cómo cubrir un cuerpo

Now, two questions:

How do you measure a thorax-outline?

On which outline (thorax or breast) are the female sizes based?

The answers to those questions will arrive in the next posts.

The male cut is the basis of the female cut

The male cut is the basis of the female cut

Men and women are structurally equal but morphologically different.

The woman accumulates a greater amount of fat and develops mammary glands. The male morphology is more like the bone structure of the man than the female.

In the upper garments patterns, having the same rib cage, the chest contour of the woman is greater than that of the man.

The increase in the female breast outline compared to the masculine one at the back and lateral part (before the breasts) is constant. From the beginning of the breasts to the middle of the front, the contour line of the woman stops being parallel to that of the man. The increase of the chest at the front is not proportionally constant. The woman’s outline is proportionally greater than the man’s is.

Wrapping a solid body is easier then wrapping a soft body. Imagine wrapping two gifts: a box of chocolates and a teddy bear.

The packaging of the hard one will be much easier than that of the soft one, especially if the first has a regular shape. The result of the teddy bear package will probably be less attractive than that of the box of chocolates.

If we make a single package with the two objects, one part of package will be more attractive, that of the box. To make the package, it will be easier to place the box on the wrapping paper and on top of it the teddy bear, because we will star the package in the rigid part.

The easiest and more attractive package will be that of the box of chocolates and the most difficult package with unpredictable results that of the teddy bear.

The simile of packages helps us to introduce the difference between male and female cutting.

Male cutting dresses a completely structured body (like a box of chocolates), female cutting dresses a semi-structured body (like a box of chocolates topped with a teddy bear).

The male cutting pattern conceptually and chronologically in the fashion history precedes the female cutting pattern.

The first treatises abounded in the explanations for the masculine tracings and at the end of their books them; they suggested some pattern to develop the feminine cutting.

The female pattern, like the package with the two objects, must begin with the rigid structure, that is, at the back.

We can draw a series of conclusions:

Male pattern design is based on the structure of the body. The female cutting is masculine cutting with a series of modifications to include the morphological differences of the feminine body.

A person who knows how to trace masculine patterns could alter their paths to transform them for the female body. Applying the rules of female patterns to male tracings does not work.

Many academies have reversed the learning process. We cannot have a solid cutting knowledge if we start developing patterns for women without the knowledge of masculine ones. You cannot start a house by building the roof.

Second conclusion: the pattern should start with the piece that contains most of the bone structure. The superior patterns should begin tracing at the back.

The female cutting is a sub section of male cutting; it is only one more conformation. For example, we will draw the trousers of a pregnant woman as the male obese ones, with few differences.

We consider feminine upper garment patterns as a very developed pectoral male conformation patterns. The women’s patronage is one more conformation of the male body, even if it seems a politically incorrect sentence.

Sección de pecho hombre mujer Cómo cubrir un cuerpo

We see that the parts that are closer to the body structure in the female breast contour are the back and side body (that means before the beginning of the breasts). Look at the image of the chest sections that we showed in the previous post.

To conclude this section we can say that the pattern of the female upper garments distributes the back and the body-side pieces in the same way as the masculine upper garments pattern. It only differs at the front due to development of breasts.

A picture is worth a thousand words


A picture is worth a thousand words

The proverb, compendium of popular wisdom, says: “a picture is worth a thousand words.”
This post and the following ones are a reflection from an image; this image will generate many more than a thousand words.
Dr Paul Richer in his book “Artistic anatomy of the human body”, second volume “Woman” includes in the plate number twelve an illustration, which represents the silhouette of a man and, superimposed on it, the silhouette corresponding to a woman of the same rib cage.

Paul Richer presents this plate to explain the location of adipose .For us, it gives us the possibility to analyse on the same bone structure the variations of men and women’s of breast perimeters.

Paul Marie Louis Pierre Richer, known as Paul Richer (1849-1933) was a great anatomist, neurologist, historian of medicine, illustrator and French sculptor. Due to his gift for observation and drawing from a living model and his background in medicine, he soon became one of the best illustrators of human anatomy of his time. He held the chair of artistic anatomy at the School of Fine Arts in Paris (1903).

The double silhouette appears on the main plate and shows a series of lines indicating the sections at different levels.

The right side of the image shows the various sections.
We have reproduced the first section of this man-woman silhouette: the chest contour section.

Sección de pecho hombre mujer Cómo cubrir un cuerpo

In the inner zone, we observe the spine and the thoracic cage (marked with dotted line).
The area of black, outside to the dotted one represents the adipose layer of the male body.
The outermost silhouette represented with a thin line is the contour of the woman’s silhouette.
We have digitized the image to include new elements or erase elements from the original drawing. We draw with a dashed line (._.) the sagittal axis of the section that in the original illustration does not exist.
This image is interesting to analyse many procedures of pattern designers and discuss principles given as certain in the world of styling and even in the marketing of garments.

THE ADJUSTED UNISEX GARMENT.

Today, several designers want to reduce sizes and to make garments that dress both sexes, the so-called unisex garments.
The fashion industry is an industry, so it seeks profits. To increase sales, it tries to include in the collections a series of trends, not only colours, and shapes, but also philosophical concepts. Continually changing shapes, colours and styles renews people’s closets.

Sometimes when trying to do something right, problems arise.

Gender equality translates into fashion in unisex garments.

The garments of men and women must have the same usability and comfort. These attributes connect with the capacity of mouvement.

Garments cannot to be too loose nor too tight. They should be wide enough to allow the development of the joints and sufficiently narrow so as not to hinder the movements.

The outer silhouette that marks the woman’s body, and the interior one, that marks the man’s are different. Aristotle said a few years ago that “equal treatment should be given to the equals and unequal treatment to the not equals” hence, the woman and man’s bodies must be treat in a different way because they are different.

Narrow upper unisex garments (the same physical garment used by both sexes) is not possible at least in non-elastic fabric because of theirs different shape.

A narrow male garment must cover the shape of the male body and vice versa.

It is possible to create an identical narrow upper garment for both sexes, transforming and giving the same fit to the basic patterns of male and female. Patterns will be different in shape but identical in look, style and comfort.

Those garments will not be unisex, they will be two different garments (male and female ones) with a look based on the gender equality of sexes.

The NASA study of the differences between body shapes, which you can find in the web, is interesting.

The narrow upper garments in elastic fabric must use elasticity attributes to give comfort with the changes of length and width due the movements of the joints. The fit ratio (positive or negative) between the garment and the body must be the same. Applying elastic attributes to use the same garment in two different bodies (male and female) structures is shoddy work.

Our first conclusion for the drawing is that narrow upper unisex garments do not exist.

Bibliography: 

Nouvelle anatomie artistique du corps humain, II cours supérieur. morphologie. La femme. Dr Paul Richer. Librairie Plon.

Cómo Cubrir Un Cuerpo is Spam proof, with hiddy
RSS
Follow by Email
Twitter
Follow Me
YouTube
Pinterest
LinkedIn
Share
Instagram